


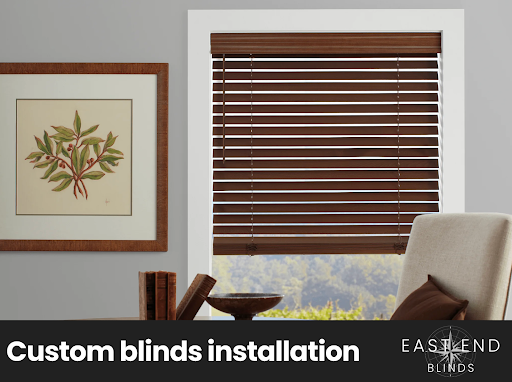
Crooked blinds create gaps and weaken light control. This guide shows how to install blinds for inside and outside mounts. It supports DIY work and custom blinds installation.
You will finish with mounted blinds that open smoothly after changing window blinds. Choose inside mount when the window opening offers enough depth. Choose outside mount when the window frame needs coverage.
Changing window blinds starts with measuring. Measure your windows, then measure the width three times. Steps change by blind type, from mini blinds to vertical blinds for sliding glass doors.
Bring a tape measure, level, pencil, drill, bit, and screwdriver. Make markings and drill pilot holes, then attach the mounting brackets.
Custom blinds installation adds expert measuring and cleaner finishes. Choose custom blinds installation when changing window blinds involves tricky trim.
Inside Mount vs Outside Mount: Pick the Right One in 30 Seconds
Pick the mount before you buy anything. This choice drives every later step in how to install blinds.
Inside mount sits inside the window opening. It gives a tailored, built in finish.
Outside mount sits on the window frame or wall. It can hide uneven edges and improve light control. It also changes how much coverage you plan around the glass.
| Decision factor | Inside mount | Outside mount |
| Look | Clean, built in | Covers trim, looks larger |
| Best when | Deep window opening | Shallow depth or obstructions |
| Light gaps | More likely | Less likely |
Inside mount fails when the depth is too shallow. The headrail can project past the trim and look bulky. It also fails when cranks, handles, or locks block the blinds or shades. Narrow side clearance can cause rubbing and unevenly mounted blinds.
Outside mount helps when privacy needs increase. It covers more area and reduces edge gaps. It also supports changing window blinds in older rooms with imperfect window frame lines.
Many homeowners choose custom blinds installation for outside mounts on large openings. Custom blinds installation also helps when the type of window creates tricky bracket placement.
Tools, Hardware, and Quick Safety Checks Before You Drill
Gather tools before you start installing blinds. Use a tape measure, level, pencil, drill, and the correct bit size. Keep a screwdriver nearby for final tightening.
Wear eye protection and keep fingers clear of the bit. Check the surface before you drill. Many window frames accept shorter screws and hold well. Drywall needs stronger fastening.
Use about one inch screws for solid wood window frame installs. Use longer screws when you must reach a stud. Use drywall anchors when screws only grab gypsum.
Anchors also help when the bracket sits above trim with no wood behind it. During changing window blinds, do not reuse old holes if they feel loose.
Measure Your Windows the Right Way (Inside Mount and Outside Mount)
Accurate numbers protect fit, function, and light control during blind installation. Use a steel tape, not a cloth tape. Write every measurement as you go.
Measure your windows in inches and stay consistent. Stand square to the window frame so the hook stays tight.
Inside Mount Measuring
Measure the width inside the window opening at three points. Take top, middle, and bottom readings. Use the smallest number for the order.
Measure height at left, center, and right. Use the tallest number unless your product guide says otherwise.
Check for out of square openings.
- Compare the two diagonal measurements.
- If the numbers differ, plan for small light gaps.
- If the blind rubs, reduce the width or choose outside mount.
Confirm depth before you buy. Make sure the headrail sits fully inside the opening.
Outside Mount Measuring
Measure the width of the coverage area, not just the glass. Add two to three inches per side when space allows. Add more when you need stronger privacy and light blocking. Measure height from your top bracket line to the preferred endpoint.
Plan for valance and clearance.
- Keep the valance clear of trim edges.
- Avoid handles, cranks, and alarm sensors.
- Confirm room for brackets to sit flat.
Custom blinds installation helps when measurements feel uncertain. It also speeds up changing window blinds in older homes.
How to Install Blinds as an Inside Mount (Step By Step)
Use these steps to install blinds during changing window blind change or custom blinds installation.
Confirm Fit and the Parts
Measure your windows again and match the headrail to the window opening. Lay out the brackets, screws, and any valance clips.
Mark Bracket Positions
Hold the first bracket inside the window frame near the top corner. Start about two to three inches from each end, then avoid any corner seams. Move the bracket inward if the headrail needs room for tilt or lift parts.
Level the Marks
Set the headrail in place and use a level to keep it straight. Mark both bracket holes with a sharp pencil.
Drill Pilot Holes
Use the correct bit size and drill straight into the jamb. Drill shallow pilot holes so the screws bite without splitting wood.
Attach the Mounting Brackets
Drive screws until the bracket sits firm and flat. Repeat on the other side, then add a center support for wide horizontal blinds.
Use Side Holes When Space Feels Tight
Use the bracket side holes if the top jamb feels shallow. Fasten into the side jamb for a stronger hold and easier drilling access. Use a bit extender when the drill cannot sit straight.
Seat the Headrail
Clip or snap the headrail into the brackets until it locks. Test the lock with a gentle tug.
Test Operation and Adjust
Raise and lower the blind, then check for rubbing on the window frame. Adjust the bracket position if the blind binds or tilts. Check clip style on mini blinds and cellular shades.
How to Install Blinds as an Outside Mount (Step By Step)
Use this method to install blinds when you mount them on trim or a wall. Outside mount improves coverage and supports tighter light control. It also fits many changing window blinds projects when the window opening lacks depth. Many homeowners choose this path during custom blinds installation for larger rooms.
Set the Finished Position
Choose the height that clears handles, locks, and alarms. Mark a straight reference line across the window frame area.
Center the Headrail
Measure the planned coverage width. Mark the center point on the mounting surface. Hold the headrail on that center mark and confirm equal overhang.
Mark Bracket Start Points
Measure in two to three inches from each end of the headrail. Transfer those points to your reference line. Shift brackets slightly to avoid weak trim seams.
Confirm the Level Before Drilling
Set a level on the headrail or your line. Correct any slope now to avoid crooked mounted blinds.
Mark Holes and Drill Pilot Holes
Hold each bracket flat and mark both holes. Drill pilot holes with the correct bit size. Use anchors when drywall sits behind the bracket.
Secure Brackets with the Right Support
Drive screws until brackets sit tight and flat. Do not crush, trim, or strip the holes during changing window blinds.
Add A Center Support Bracket For Wider Blinds
Add support when the headrail spans wide or feels heavy. Use it often for faux wood blinds and wide horizontal blinds. Place the support near the center and keep it aligned.
Seat the Headrail, then Finish the Valance
Snap the headrail into the mounting brackets until it locks. Test lift and tilt before final trim work. Attach valance clips, then fit returns if your set includes them. Align corners so the front edge looks clean and straight.
By Blind Type And Window Type (Quick Tweaks That Prevent Mistakes)
Small details change outcomes in how to install blinds. Match your steps to the type of blinds and the type of window.
This approach improves light control and reduces rework during changing window blinds. It also supports consistent custom blinds installation results.
Faux Wood Blinds and Bathrooms or Kitchens
Faux wood blinds handle moisture better than real wood in busy rooms. They also weigh more than mini blinds. Use firm mounting brackets and strong screws.
Add a center support when the span and weight increase. Keep the headrail level so slats stack evenly. Wipe grease and steam buildup to protect the finish and smooth tilt.
Cellular Shades
Cellular shades need precise bracket placement for a smooth lift. Keep brackets square and aligned with the headrail ends.
Confirm clearance inside the window opening for inside mount installs. Seat the headrail fully, then test lift and lower several times. Watch for rubbing on the window frame and correct it early.
Vertical Blinds For Sliding Glass Doors
Vertical blinds suit sliding glass doors and wide openings. Center the headrail carefully before you drill. Keep bracket spacing consistent across the span.
Hang vanes in the same direction for an even look. Test the traverse and tilt before you snap on any finishing pieces. Custom blinds installation helps when walls vary or doors sit out of level.
FAQs
How do I measure my windows for inside mount blinds?
Measure the width inside the window opening at the top, middle, and bottom. Use the smallest width.
How much overlap should outside mount blinds have for light control?
Aim for two to three inches per side when space allows. Add more for bedrooms and bright exposures.
What drill bit size should I use to drill pilot holes for blind brackets?
Match the bit to the screw shank, not the threads. The screw should grip without splitting the wood.
Can I install blinds if the window frame is shallow?
Yes, but an inside mount may project outward. Outside mount often looks cleaner and improves coverage.
Is changing window blinds easier if I reuse the old holes?
Only reuse holes that still hold screws tightly. Loose holes can cause tilted mounted blinds.
When DIY Turns into Custom Blinds Installation (And What A Pro Changes)
DIY works well when the window opening is square, and the window frame is solid. Some projects need custom blinds installation to remove the risk. East End Blinds offers a free in home consultation with accurate measurements.
Our team then completes professional installation so the window treatment sits level and operates smoothly. This support helps during changing window blinds when the old holes feel weak, or the trim varies.
Many homeowners choose help for tricky windows and large openings. Sliding glass doors often need precise headrail centering and consistent support.
Motorized options also benefit from correct bracket placement and clean wiring decisions. Custom blinds installation protects the finish and saves time. It also improves light control when you want the best fit.