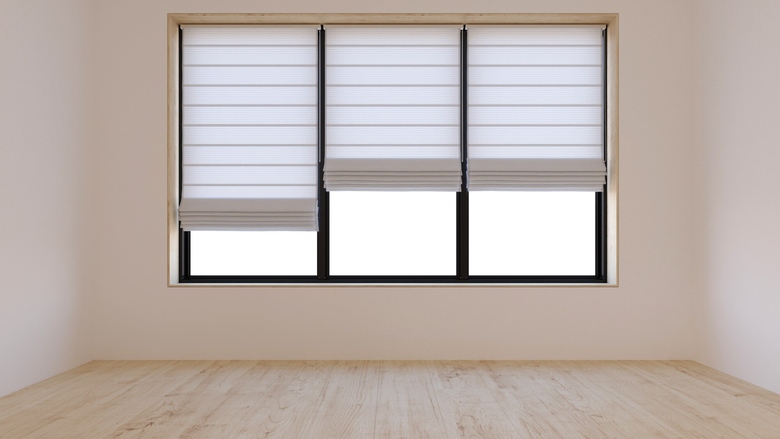
Roller shades are a versatile and stylish window treatment option with numerous benefits. They provide excellent light control, privacy, and energy efficiency, making them a popular choice for many homeowners in Bethpage, NY. Compared to other window treatments, roller shades are often more affordable, easier to install, and available in various styles and colors. This makes roller shade installation an excellent option for any room. With their sleek design, roller shades can complement various interior decor styles, adding functionality and aesthetic appeal.
Table of Contents
Introduction
Key Takeaways
Preparing for Installation
Choosing the Right Roller Shades
10 Installation Techniques and Tips
Troubleshooting Common Issues
Frequently Asked Questions
Key Takeaways
✓ Roller shades are stylish, provide privacy, control light, and are energy-efficient.
✓ Measure the width and height of your windows at three points, using the smallest measurement for accurate sizing.
✓ Choose from light filtering, blackout, and dual shades based on your needs.
✓ Always follow the manufacturer’s instructions carefully during installation.
✓ Use a pencil and level to mark the precise positions for your brackets.
✓ Ensure the brackets are level and securely fastened for proper shade installation.
✓ Adjust the tension of the roller shades to ensure smooth rolling; make adjustments if they are too tight or loose.
✓ Regularly clean and promptly repair wear and tear to maintain roller shades.
Preparing for Installation
Proper preparation is essential for a successful roller shade installation. Gathering all necessary tools, accurately measuring your windows, and understanding the shade installation process will save you time and prevent potential mistakes. With the proper preparation, you can ensure a smooth, efficient shade installation, resulting in beautifully functional roller shades.
Gathering Materials and Tools
Securing the appropriate materials and tools ensures a seamless roller shade installation. Everything you need on hand prevents interruptions and ensures the process goes efficiently and correctly. Proper preparation sets the foundation for a professional-looking result and hassle-free shade installation.
Here are the materials and tools you will need for roller shade installation:
- Roller shades
- Mounting brackets
- Screws and anchors
- Measuring tape
- Level
- Pencil
- Drill and appropriate drill bits
- Screwdriver
- Safety glasses
Measuring Your Windows
Accurate measurements are crucial for shade installation, ensuring your roller shades fit perfectly and operate smoothly. Proper measuring prevents issues like gaps or uneven fitting, which can affect both functionality and aesthetics. Follow these tips for precise measurements:
Measure Width and Height at Three Points
Measure the width and height of your window frame at the top, middle, and bottom. Use the smallest measurement for width and height to ensure the shade fits properly within the frame. This helps avoid gaps and ensures a snug fit.
Use a Reliable Measuring Tape
Use a sturdy metal measuring tape to obtain accurate results. Fabric or flexible tapes can stretch and give inaccurate measurements. A reliable measuring tool ensures precision and prevents errors.
Double-Check Measurements
Always double-check your measurements before cutting or ordering shades before starting the installation process. Re-measuring ensures accuracy and gives you confidence in your measurements. This step helps avoid costly mistakes and rework.
Record Measurements Clearly
Write down your measurements immediately to avoid forgetting or mixing them up. Clearly label each measurement with its corresponding window location. This helps streamline the roller shade installation process and ensures each shade fits its designated window.
Consider Mounting Type
Decide whether you will mount the shades inside or outside the window frame. Inside mounts require precise measurements of the window recess, while outside mounts need the overall window area covered. This consideration affects how and where you measure for an accurate shade installation.
Choosing the Right Roller Shades
Choosing the right roller shades is crucial for both functionality and aesthetics in your home. The correct shades can enhance privacy, effectively control light, and complement your interior decor. Selecting the appropriate type, fabric, and color ensures that the shades meet your needs and preferences. Investing time in the shade installation and choosing the right roller shades results in a more comfortable and visually appealing living space.
Types of Roller Shades
Choosing the right type of roller shades is essential to meet your specific shade installation needs and preferences. Each type offers different levels of light control, privacy, and aesthetic appeal. Here are the main types of roller shades to consider:
Light Filtering
Light filtering shades are designed to allow natural light to enter the room while maintaining privacy. They diffuse sunlight to create a soft, warm glow, making them ideal for living rooms, kitchens, and common areas. These shades are perfect for those who want to enjoy natural light without compromising privacy.
Blackout
Blackout shades are designed to block all light from entering a room, providing complete darkness. They are perfect for bedrooms, media rooms, or any space where you need total light control.
Dual Shades
Dual shades combine the benefits of light filtering and blackout options in one, offering versatility and convenience. They typically feature two layers of fabric: one for light filtering and one for blackout, allowing you to switch between the two as needed. Additionally, fully closed, highly reflective blinds can cut heat gain by up to 45%. This makes them an excellent choice for multi-purpose rooms where you need different levels of light control at different times.

Selecting the Right Fabric and Color
Selecting the right fabric and color for your shade is essential to achieve your space’s desired look and functionality. The right choices can enhance your room’s decor and provide the appropriate level of light control and privacy. Consider the following tips for shade installations:
Match Fabric to Room Function
Choose fabrics based on the room’s function. For example, light-filtering fabrics work well in living rooms and kitchens, while blackout fabrics are ideal for bedrooms and media rooms. Light-filtering fabrics allow natural light to enter while maintaining privacy, creating a bright yet private atmosphere. Blackout fabrics block all light, ensuring complete darkness for better sleep or media viewing.
Consider Light Control Needs
Determine the level of light control you need in each room. Opt for blackout shades for spaces where you want to block out sunlight completely, such as bedrooms. Choose light filtering or sheer fabrics for areas where you want to enjoy natural light while reducing glare.
Coordinate with Interior Decor
Select a color that complements or contrasts stylishly with your existing decor. Neutral colors like white, beige, or gray can blend seamlessly with most interiors, while bold colors can make a statement or add a pop of color to your room. Consider your room’s overall color scheme and style when choosing your shade color.
Evaluate Fabric Durability
Consider the fabric’s durability and maintenance, especially in high-traffic areas or homes with children and pets. Durable, easy-to-clean fabrics are ideal for kitchens and playrooms. High-quality fabrics will withstand wear and tear and maintain their appearance over time.
Check UV Protection
Some fabrics offer UV protection. When ultraviolet radiation strikes textile surfaces, it can be transmitted, absorbed, and reflected, converting it into another form of energy. If UV protection is essential, look for shades with this feature. UV-protective fabrics are beneficial for rooms with significant sun exposure.
10 Installation Techniques and Tips
Installing roller shades can be straightforward if you follow the right techniques and tips. Proper shade installations ensure that shades operate smoothly and look professional, enhancing your space’s overall functionality and aesthetics. The following tips cover essential steps, from reading the manufacturer’s instructions to adjusting the tension to help you achieve a successful and hassle-free installation.
Tip 1: Read the Manufacturer’s Instructions
Read the manufacturer’s instructions carefully before starting the installation process. These instructions often contain specific details and tips crucial for proper installation. Overlooking these details can lead to mistakes and complications, which may affect the functionality and longevity of your roller shades. Review and understand the instructions to ensure you know any unique requirements or recommendations for your shades.
Tip 2: Mark Your Mounting Brackets
Use a pencil and level to mark where your mounting brackets will go. Accurate marking ensures that your roller shades will be level and operate smoothly. Measure twice to avoid errors; misaligned brackets can cause the shades to function improperly or look crooked. Double-checking your markings before drilling will save time and prevent unnecessary rework.
Tip 3: Drill Pilot Holes
When conducting shade installations, use a drill bit that is slightly smaller than the screws you will be using to ensure a snug fit. This step is especially important for shade installation on drywall or plaster, as these materials can be more prone to damage. Pilot holes provide a guide for the screws, making installation more precise and secure.
Tip 4: Secure the Mounting Brackets
Ensure your mounting brackets are level and securely fastened to the wall for smooth shade installations. Use appropriate screws and anchors based on your wall type; for example, utilize plastic anchors for drywall and toggle bolts for plaster. Secure brackets are crucial for your roller shades’ proper operation and safety. Double-check the alignment and tightness of the brackets to prevent the shades from loosening or falling.
Tip 5: Assemble the Roller Shade
Follow the manufacturer’s instructions to assemble the roller shade mechanism for your installation. Common errors include incorrect assembly of the clutch or chain, which can affect the shade’s operation. Take your time and double-check each step to ensure all components are correctly installed. Proper assembly is key to your roller shades’ smooth and reliable functioning.
Tip 6: Install the Roller Shade
Once assembled, install the roller shade onto the brackets. Ensure the shade clicks into place securely and test its movement to confirm the right shade installation. Proper installation is critical to the shade’s functionality, ensuring that it rolls up and down smoothly without any issues. Take care to follow any specific instructions related to the mounting process.
Tip 7: Adjust the Tension
Adjust the tension to ensure smooth rolling during shade installations. If the shade feels too tight or loose, consult the manufacturer’s guide for proper tension adjustments. Maintaining the correct tension is essential for prolonged functionality, preventing issues like the shade from staying in place or becoming challenging to operate. Regularly inspect and fine-tune the tension to uphold optimal performance.
Tip 8: Test the Roller Shade
Test the functionality of your roller shade by rolling it up and down several times. Check for smooth operation and make necessary adjustments to ensure the shade functions as intended. This step ensures your shade installation succeeds and helps identify potential issues early on. Thorough testing can prevent future problems and ensure user satisfaction.
Tip 9: Add Finishing Touches
Add valances or decorative elements to enhance the look of your roller shade. These finishing touches can hide brackets and polish your shades, contributing to your room’s overall aesthetic. Valances can also provide additional light control and insulation benefits. Choose decorative elements that complement your interior design for a cohesive look.
Tip 10: Clean and Maintain Regularly
Regular cleaning and maintenance will keep your roller shades looking and functioning well. Dust the shades regularly and clean any stains with a damp cloth to maintain their appearance. Address wear and tear promptly to prolong the life of your shades, ensuring they continue to operate smoothly and look great. Proper maintenance can also help prevent damage and reduce the need for costly repairs or replacements.
Troubleshooting Common Issues
Even with careful shade installation, you may encounter common issues with roller shades. Addressing these problems promptly can ensure your shades continue to function correctly and maintain their aesthetic appeal.
Roller Shade Won’t Roll Up or Down Properly
If your roller shade isn’t rolling up or down correctly, check for obstructions blocking its path. Ensure the mounting brackets are level, as uneven brackets can cause operational issues. If there are no visible blockages and the brackets are aligned, adjust the shade’s tension to see if that resolves the problem. If these steps don’t work, you may need to re-do the shade installation process, carefully following the manufacturer’s instructions to ensure all components are correctly assembled and positioned.
Uneven Rolling
Uneven rolling is often caused by misaligned brackets or incorrect tension in the roller mechanism. First, check that the brackets are installed at the same height and are ideally level; even a slight misalignment can cause the shade to roll unevenly. Adjust the tension of the shade as per the manufacturer’s guidelines to ensure it rolls up and down smoothly. If these adjustments don’t resolve the issue, inspect the shade for any manufacturing defects or damage affecting its operation.
Shade is Too Loose or Too Tight
If your roller shade is too loose, it may not stay in place when rolled down, while a too-tight shade can be difficult to operate. Adjust the roller mechanism to correct the tension, following the specific instructions provided by the manufacturer. Proper tension is crucial for the smooth operation of the shade and to prevent it from sagging or being too rigid. Regularly check and fine-tune the tension to maintain optimal performance and ease of use.
Frequently Asked Questions
What is the difference between roller blinds and roller shades?
Roller blinds and roller shades are similar window treatments but differ primarily in design and functionality. Roller blinds typically feature slats or vanes that can be tilted to control light and privacy, while roller shades are made of a continuous fabric that rolls up or down to cover the window. Roller shades offer a sleek, modern look and are often chosen for their simplicity and ease of use, whereas roller blinds provide more precise light control.
Are roller shades difficult to install?
Roller shades are not difficult to install if you follow the proper steps and guidelines. Most homeowners can complete the shade installation with the right tools, accurate measurements, and careful attention to the manufacturer’s instructions. Proper preparation and following detailed instructions make the shade installation process straightforward and manageable.
Are roller shades more expensive than blinds?
The cost of roller shades compared to blinds varies depending on the materials, quality, and customization options. Custom roller shades allow you to select from various materials, colors, patterns, and designs, making them more expensive than essential blinds. However, both options are available, and the price can increase for high-end or motorized versions of either window treatment.
Trust Blinds Installation - East End Blinds for Your Roller Shade Installation Needs
Don’t settle for anything less when it comes to your roller shades. Trust the experts at Blinds Installation – East End Blinds to provide professional and precise roller shade installation services tailored to your needs. Contact us today to check our showroom and collection in Bethpage, NY, and transform your space with beautiful, functional roller shades installed by our skilled team. Your satisfaction is our priority!


